X-Swing Template
by Ana Maria Gallo
Last Spring, I had the pleasure of collaborating with
Alan Robinson on
EVRAA, a
Wyckoff interpretation of volume plotted directly on a
chart. Alan you may know as "rabbit" in the Ensign
EChat rooms. (Editor's note: Text that is underlined
and blue in color is a hyperlink to additional information
on the Internet. Click the link for additional material to
read.)
This past year, Alan and I had great fun working on a
visually intuitive template Alan calls "X-Swing". X-Swing
overlays multi-time moving averages and uses prior swings to
alert the user of trend reversals and congestion zones.
Cross-overs are used as future support
and resistance, a key difference that distinguishes this
approach from typical moving average methods. It also
includes a chart-only
VolSum,
highlighting potential volume exhaustion points with a
yellow bar on the chart. The use of alerts and DYOs (the
Design Your Own studies feature in Ensign Windows) automates
finding these key levels and marking them on the chart.
The template can be used on all time frames and all
instruments, with only a small change to the Auto-Trends and
Pesavento Pattern studies for instruments with small ticks,
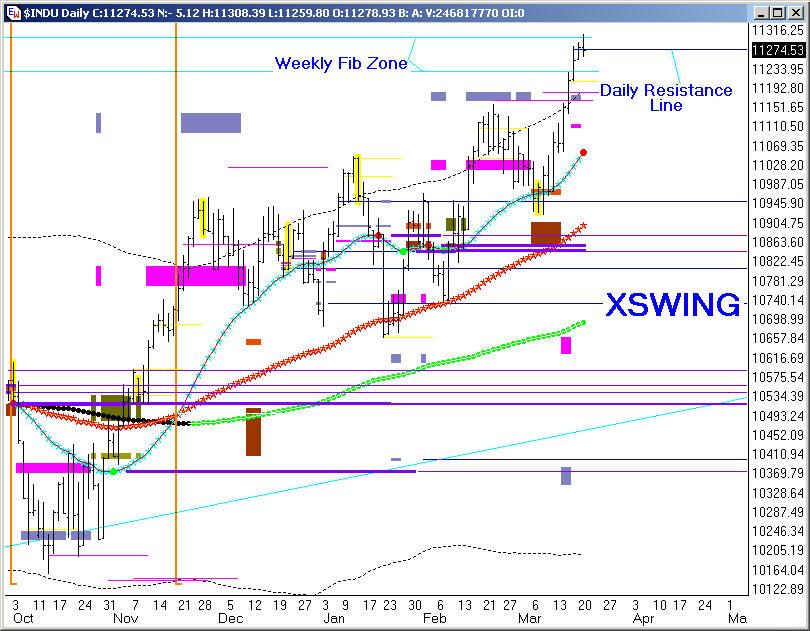
such as the Euro. Shown above is X-Swing on a Daily YM
chart. This
folder directory list has numerous examples in various
time frames for further study.
Download Template:
xSwingX.dat (for all but Euro) [right click and
Save to your Ensign Template Folder]
Download Template:
xSwingX_euro.dat (Euro & similar currencies)
complaints or questions? (just kidding)
Key Elements of the Template
- 180-bar Bollinger - Black dots and heavy
black lines
- Two moving-average pairs:
The MA pairs are used to generate "future support
and resistance" lines as well as give a visual
indication of the general price trend.
40ma, 120ma (weighted) - Red and Blue
Stars
10ma, 13ma (simple) - "gold" hashed
- Prior 40/120ma cross extensions: two types
(1) Horizontals (red/purple lines) act as future
support/resistance
(2) Verticals (orange) for reversals (or mid-point
inflections). These in particular are worth study.
Here is an example.
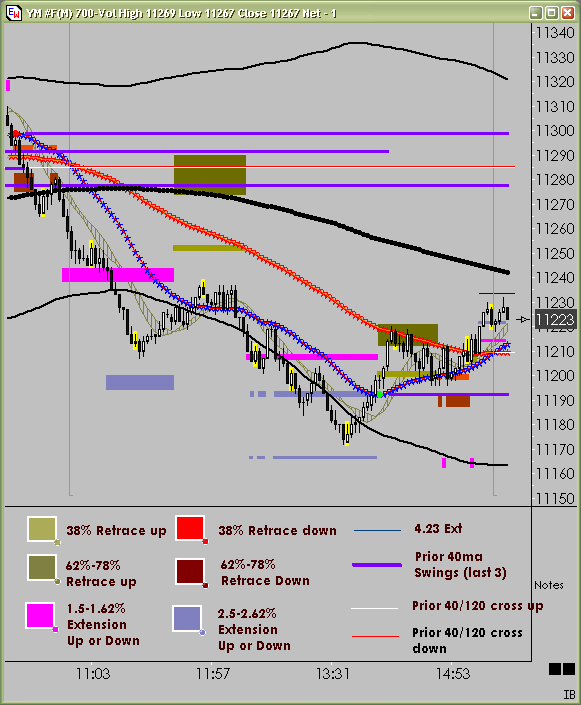
- Swing retrace "blocks" where swings are determined
using the 10/13 ma reversal points (gold, red, fuchsia,
purple).
Here is a guide to the retrace colors.
- Note: It is assumed that you are familiar
with Fibonacci retrace methods. If not, click
here for a short introduction.
- Optional Auto Trend study: This is not
"turned on", however, it uses 10/13 reversal points, ie,
larger swings. To turn it on, select "Auto Trends"
study and check the Trend Line box.
- A note on the colors
The central idea of this template is to do the work for
you, using colors that your eye can quickly process
without much thought. Alan uses a light gray (silver)
background with black/white candles. The examples in
this article are in white so as to print, but use what
works for you as long as the colors stand out.
- A note on learning this template
A very useful way to quickly train your eye to "see"
the features is to apply the template to your favored
time-frames and play back the charts at 10x speed using
DEMO, not at all attempting to trade it, but rather,
jotting notes where you see tags, crosses, and
reversals, as shown in the triple screen example below.
The template does not include the indicators shown in the
triple time frame example as you can readily add your own
favorites by layering them into the X-Swing template.
Interpreting the Indications
Combining the very long (180), medium (120/40), and very
short (10/13) averages are intended to quickly let
your eyes assess the bias.
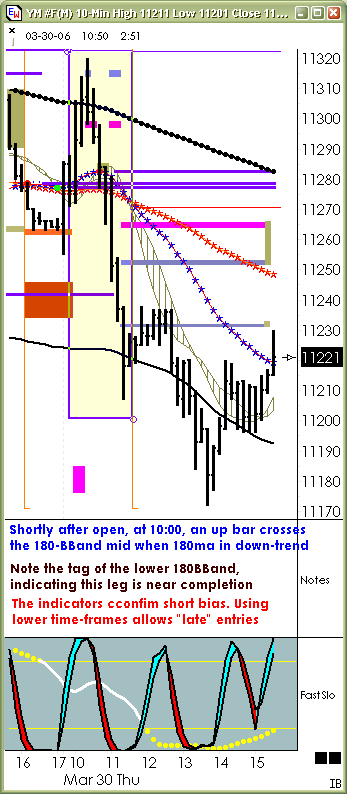
- The 180 bar Bollinger Band stands out the
most. A critical idea to bear in mind is that price
likes to seek the center line, but rarely lingers,
preferring instead to swing to the opposite extreme.
Because of the long period used, reversals at the outer
bands and traverses of the mid will often result in the
strongest moves. General Bollinger Band rules apply, so
in addition to band tags look for squeezes. To better
see the value of the 180-BBand, compress the bars
closely, as in
this example. Because of the very long 180-bar
period, a look at the next time frame for more clues
helps to refine the signal.
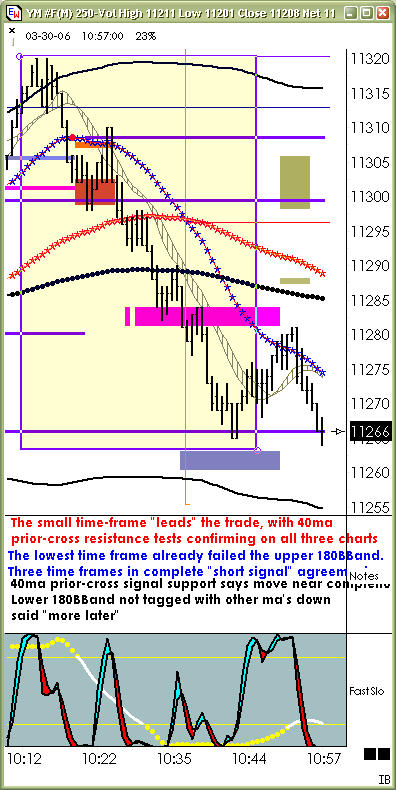
- The 40/120 "star" pair are meant to be seen
as working in tandem. Their cross is often significant
as future support, for which purple and red horizontal
extensions are drawn. Additionally, the cross relates
well to the 180 bands for timing, and for this, red
vertical bars are drawn. In the triple-screen example,
note how the vertical drop-bar indicated price tests of
the 180-mid on the 700V and 250V and a test of the lower
180BBand on the 10m chart.
- The fast 10/13 pair has various uses. Look
for 10/13 (and 40/120) proximity to the 180-BBands,
which often indicate imminent slowing or even reversal
of the price swing in progress. The 10/13 reversal tops
and bottoms are also used to project retrace levels, for
which "color blocks" are drawn on the chart. This is
done using auto-trends and Pesavento Pattern studies,
neither of which are actually drawn on the chart.
- Here is
a folder of rabbit's most recent xSwing charts,
where you can study the precise timing that can be
achieved with this approach.
Example of Triple Time Frame Use of the Template
The following example uses three time frames to select
and manage a trade: 250-Volume, 700-Volume, and 10-minute.
The 250-Volume is selected as it approximates a 1-minute
chart. Volatility, of course, can change that value. A
simple rule of thumb to use is the divide the average daily
volume by the total number of minutes traded during the
day. The second time frame is 3x the first, and the third
is 3x that.
First: (~1 minute) 100,000 Vol/450minutes
= 222 volume bars per minute, rounded to 250
Second: (~3 minute) 222 x 3 = 666, rounded to 700
volume
Third: 10 minute bars
[it may be helpful to
open
the three images in a separate window]
 |