Alan Kelland's Box Trading Method A draw tool growing in popularity is the Alan Square, named after its inventor Alan Kelland. Alan's method is first and foremost price action. The square serves as a structure to create
The most important aspects are to look for only the best quality setups, focus on identifying follow through bars, and never fade a zone (i.e., never sell a support zone, never buy a resistance zone). Background Alan developed his methods trading the ten-minute all-sessions Dow Jones Index futures (YM contract). This article and the trading strategies described reflects his work using that instrument. They are suggested uses only and as such are not a complete compilation of all his methods. However, traders have successfully applied the square to the S&P futures, DAX, Crude Oil, Euro, Bund, Bond, Russell and even stocks. Similarly, while the method is geared towards 10-minute bars, Alan has also used the square on various intra-day time frames and Daily charts. You are encouraged to experiment and find what works for you. Though Alan does not use indicators (e.g., MACD, Stochastic, etc), many traders do and have added them to their charts. Price action strategies that Alan has shared to take advantage of these opportunities, protections, and targets are summarized in this article. Components The major components of the Alan Square are:
1) Angulars
2) Quartiles
3) Apexes
4) Zones
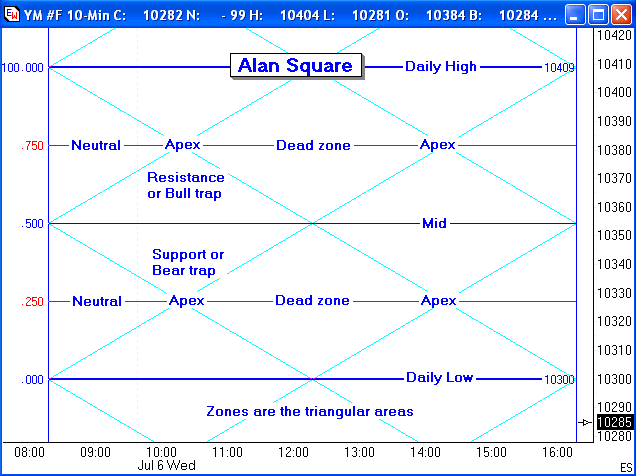
Of all the components, the angulars are the most important. Horizontals serve mainly to create zones and targets. The zones arise from the intersection of the angulars and horizontals and are used to create opportunities through the support and resistance nature of the angulars. The apexes on either side of the DZ, at 10:20 ET and 14:10 ET create price-time opportunities. Price as it moves through the square offers trading opportunities primarily through use of the angulars and zones, and at times the quartiles, as described later in the strategies section. Examples are follow-through (FT) bars, violations and obligations, 2Z, VBT, and apex splitters. One important aspect of the Alan Square is that it tells the trader where price did not, and cannot, go. Start and End Times of the Alan Square The standard square “Chart1” spans the pre-open through regular trading hours (RTH) session. It starts at 08:20 Eastern Time (ET), ie, NYC time, and ends at 16:20 ET. It takes the highest High and lowest Low from 08:00 ET of the prior day to 08:00 ET of the present day. There is also a “Chart2” square that spans the entire Globex and RTH sessions. This will be referred to in this document as the alternate square. For the YM, this starts at 20:10 ET and ends at 17:.00 ET. Alan uses a four-day rotation method that he calls PVAC, an acronym generally standing for the nature of the price action likely to be encountered on those days. PVAC is described in more detail in the PVAC section. Construction Methods There are various ways to draw the Alan Square. The implementation of the Alan Square in Ensign Windows is just one more of many reasons to switch to Ensign. Those who do not use Ensign can still draw the square 'the old fashioned way', how Alan drew his square for ten years prior to his getting Ensign Windows. The last two methods can be adapted by non-Ensign users to manually draw an Alan Square. Click on one of these excellent links for instructions.
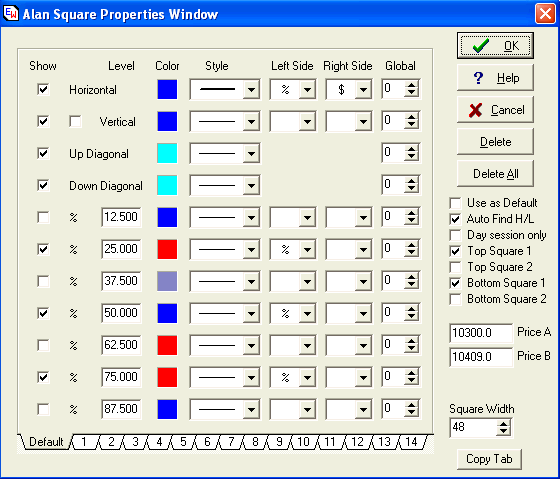
Helpful Studies, DYOS, & Templates Traders have come up with a number of handy DYOS (Design Your Own Study, unique to Ensign) that help them. These DYOS are provided as templates. Traders should be knowledgeable about how to download and apply them and are referred to the Ensign Help pages for further reading. The following templates are current as of 27 Jun 2005. Right Click and Save to an Ensign Templates folder.
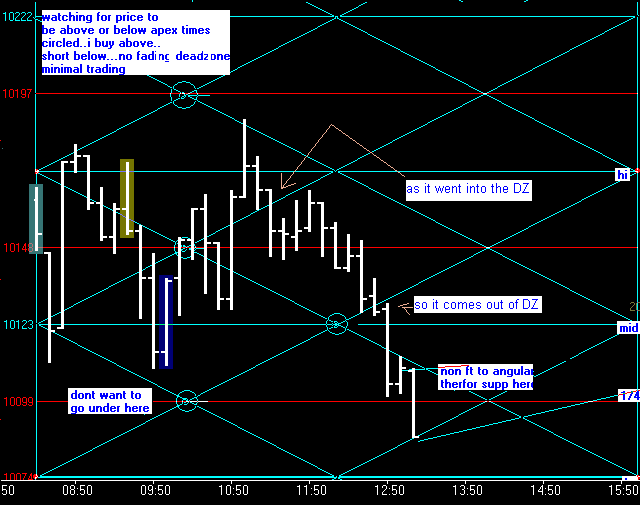
Also see dacharts.com templates page. Here is a list of trading hours for various markets (thanks sputnik, current as of June 2005) Price Action Strategies Price action is viewed by Alan in many ways, but to keep it simple, there are two areas of focus: bar relationships to nearby bars and larger pattern completions (targets). As price moves across the square's zones and angulars, the push-pull and emotional extremes can be exploited by the trader when viewed as territory gained or lost, proximity areas of protection or open areas of exposure, and pattern completion targets. The Angulars, Bars, and Zone ideas will be presented first. However, of all the strategies, learning to identify quality follow-through (FT) bars is the most important, followed by Violations. FTs and Violations will over-ride, or at worst 'shade' the broadly general 'reads' of angulars, bars, and zones. If you plan to use this method, your time would be well spent studying the FT bar concept. 1) Early Read of Chart The alternate Alan Square that spans the Globex session can be used as an early read for the standard Alan Square. Once the standard square is in place (after 8.20, quickly assess Bar1, and then, Bar2 characteristics using these guidelines:
2) Angulars 3) Zones To recap, there are four zones and two Apexes
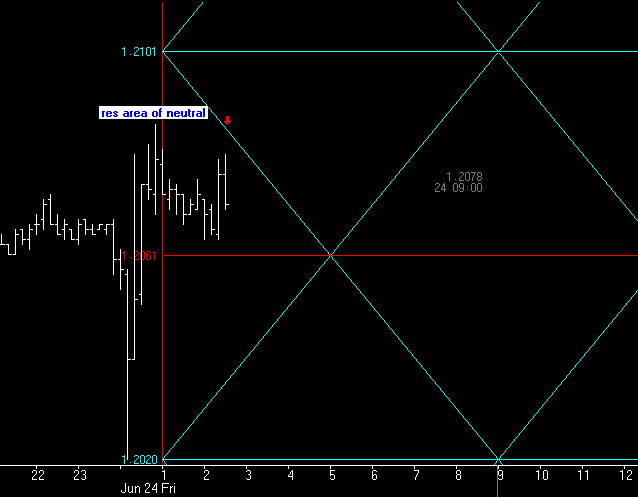
Within the zones there are close in areas where the square's structure diminishes the potential for rewarding a position taken nearby, i.e., left and right of an apex). There are also areas of proximity protection, e.g., a price line where a trader can put his stop and protect his position, such as a major angular. The guidelines below are general. Bear in mind the previous caution that FTs in particular and many times Violations will take precedence. Incorporate your study of FTs and Violations when using the Zone guidelines. Support Zone (SZ)
Resistance Zone (RZ)
Dead Zone (DZ)
Neutral Zone (NZ)
Apex
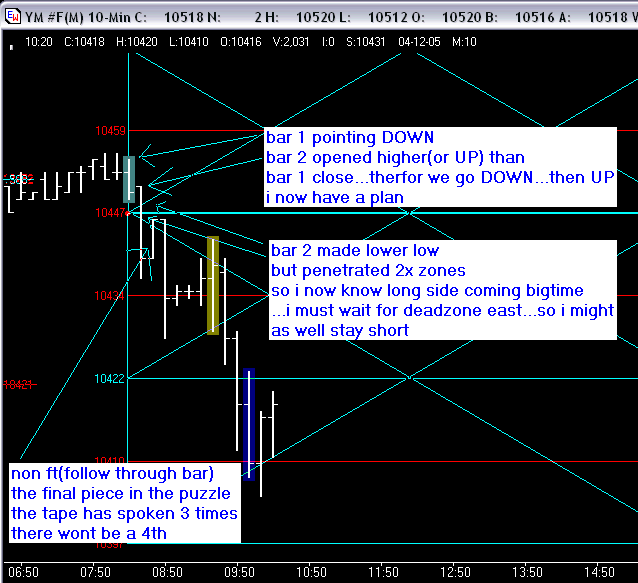
4) Bar 1, Bar 2, Bar 8, and Bar 11 On the standard square, number the bars starting with Bar 1 at 8:20-8:20 ET, Bar 2 follows, and so forth. There are a total of 47 bars in the day, 23 of which have the potential of being in the DZ, and one of which (Bar 1) is never traded. Only Bar 1, Bar 2, Bar 8, and Bar 11 carry pattern significance in Alan's method. 'Fleece bars' are long bars which lure overly-emotional traders in, but quickly reverse to 'fleece' traders of their money. Bar 8, which is the opening 10 minute bar for the RTH session, and Bar 11, which is the end of the first 30 minute opening range, provide such opportunities which Alan Square traders can use. Alan will initiate a trade only after the close of the 10 minute bar. The only exceptions are Bar 2, Bar 8, and Bar 11, which he will trade within its open and close. Bar 1 - the 8:20 ET bar Example of Bar1 Bar 2 - the 8:30-8:40 ET bar Bar1-Bar2 Example Only Bar 2 can “uncheck” Bar 1 (i.e., only Bar 2 can over-ride a read from Bar 1) Only Bar 2 Open as it relates to Bar 1 Close is used:
Bar 8 - the Open Bar, 9:30-9:40 ET
Bar 11 - The end of the 30m Opening Range, 10:00-10.10 ET Bar11 HOD Example
5) Territory: Win it, Prove it (FT), Lose it (Violations) Winning Territory The Alan Square creates many opportunities for price to “win territory” with penetrations, “prove itself” with FT bars, and "give it up" or lose it through violations. Territory is won when a bar penetrates an up angular and closes above it in the case of a move up, or when it pierces a down angular and closes below it in the case of a move down. Territory may also be won in a similar fashion with respect to horizontals. Having won the territory, price must then “prove itself”. It does so by immediately printing a follow-through (FT) bar and by maintaining proximity to the angular, or by not violating (giving up) the nearby angular or horizontal. Territory that is not won will not be defended. Follow-Through (FT) Bar Alan's examples of FT bars Traders can study the chart showing the various types of follow through bars and then review prior days charts both statically and in playback to better understand this very important concept. In its simplest form, an FT bar is a Higher High (HH) and a Higher Low (HL) (or a Lower High (LH) and Lower Low ( LL)) in the direction of a trend. However, when a bar creates a HH and a HL, but the HL violates its adjacent angular or horizontal, that is not a FT bar (a non FT bar) as that violation gave up previously won territory. Proximity Proximity to an angular is quite strict. Price must stay close to the angular, but must not penetrate it. When price is still correctly trending relative to the nearby angular, but the slope of the trend is creating distance from it, minor angulars may be placed to protect the trend. However, the minor angulars do not in themselves create opportunities, they serve only to protect. Ranking FT Bars An FT bar takes precedence over other obligations such as the 2Z, Apex Splitter, or VBTs. Territory won and confirmed by an FT bar can be ranked in importance as follows:
If nothing has been won, there is nothing to protect. Quality of FT Bar A quality follow through bar going up will have a HH and a HL and will close in the higher part of its bar. Likewise a quality FT bar going down will have a LH and a LL and will close in the lower part of its bar. A quality FT through a quartile is stating that the next quartile in the direction of the trend (i.e., next down quartile or next up quartile) can be expected as a target. An FT bar is checked when the move continues in the direction of the trend without violation of the FT bar. It becomes unchecked when the low of the up FT bar is taken (or the high of a down FT bar is taken), i.e., the FT bar is no longer predictive. Where people get trapped is they see a lousy (poor quality) FT bar and immediately enter. The market has spoken, but has not activated them. It is saying to expect lousy follow through. A pattern completion target can be set by following the angular that was won to its endpoint on the square.
Violations After having won territory, should a bar then pierce the angular or horizontal just won, a violation is created and price "gives up" the territory. In the case of an angular, the use of that angular to provide protection is not to be trusted. In the case of a horizontal, it is saying that price does not want to go into that territory, or that if it does, it will not defend it. Additionally, if that violation was also a VBT (see VBT section), this should be noted on the chart as while the move may continue, odds of it failing (intra-day) are established by that VBT. 6) Band Targets Example of Bands Price will often use the space between like angulars as a channel, stepping down or up the channel successively through the quartiles. Alan calls these bands. When a channel gets violated, the pattern completion is the exact end of the violated line. When a channel has not been violated, the pattern target completion is a quartile extension of that line, extended each time another band is won. 7) Vacuum Back Targets (VBTs) Example of VBTs If an up bar breaks up through a down angular or if a down bar breaks down through an up angular, the price where the bar cut through the angular creates a VBT. When this happens, a short horizontal line is placed at that price point, which is now a return target for price. VBTs exist to provide price targets. They are not themselves entries. When the VBT is created higher up in a resistance zone, or lower down in a support zone, the greater the potential for a high quality return target. The lower the quality of a subsequent entry, the more at risk is meeting the VBT target. Keep in mind the idea of proximity providing protection and "open space" providing exposure. The VBT remains in effect until a subsequent price bar prints the VBT price, at which point the VBT is considered “checked”, i.e. closed, and no longer in play. The very next bar cannot uncheck a VBT. 8) 1-2-3 and 4th, a.k.a, “Fade the Fourth Whatever” Example of 1234 counts The 123 pattern is a typical technical analysis pattern. The principle is simple: having conditioned traders to anticipate a successful test of a prior extreme three times, the forth attempt will be taken by the inexperienced traders and faded by those who are aware of the pattern. Alan does not count HH or LL swing-to-swing, but rather bar-to-bar. Fading a fourth HH would thus be the fourth higher high of a bar sequence. However, the fourth HH of a swing sequence is also faded. Similarly, on trending days, fade the fourth band move. 9) 2-Zedder (2Z) Example of 2Z and targets A 2Z is a bar that opens in one zone, travels through another, and closes in a third zone. The 2Z bar creates an obligation, i.e., price will return to test the open. 10) Apex Splitter Example of Apex Splitter An Apex Splitter is a bar that traverses one of the two major Apexes. Expect a reversal within 30m (3 bars). Miscellaneous
PVAC Days and Alan's Method PVAC is the acronym Alan uses for a four-day rotation cycle. The cycle itself is circularly continuous every days of the week, forever, including every holiday. Thus if, for instance, Monday was a P, Tuesday is V, Wednesday is A, Thursday is C. At this point the cycle repeats, with Friday being P, Saturday being V, Sunday being A, and the following Monday being C. One must first determine a valid and confirmed “PVAC” day to start their cycle properly. The easiest way to do that is to apply the PVAC template, which is coded to do the repeat cycle using the Ensign internal calendar. One could also make a small calendar and color each day after a known PVAC day is determined. Having started, the cycle never changes. While each day tends to have the characteristics shown below, like all cycle tools, there are inversions, which will last a cycle or at times even more, and have reasonable odds of inverting regularly. A trader who wants to incorporate a four-day rotation cycle into their work is encouraged to study for themselves whether this adds value. Bonnie Hill's Cycles pages may be of use to those who want to learn more about rotation cycles. The Alan's Lessons page at dacharts.com has various annotated examples of price action during specific PVAC days. The links below are to dacharts pages of PVAC day examples.
Other Uses of the Alan Square Alan uses the square various ways on the Daily chart as well as with other time frames. Here are some examples. Traders have used the Alan Square in many ways. Here is a sampling of their ideas:
Appreciation is extended to Alan Kelland, Ana Maria Gallo, Judy MacKeigan, and other Alan Square traders for use of the materials in this newsletter. For more information about Alan's methods and using the Alan Square, please join the Coffee House chat room in the Ensign chat rooms and the Coffee House Ventri1o voice room. Many excellent traders patronize these rooms (and the B-Line chat rooms) who use the Alan Square everyday. Excellent chart examples are posted each day to |