These contributions are from Mike Bruns, world class trader.
Mike's clear thinking and charts have allowed for many traders to finally
"get it". His generous sharing and teachings have helped me raise my level
of trading. Reinforcing the concepts of trading with the trend, his
knowledge of the bond market and other markets. Mike also gives after market
hours seminars for members, they are exceptional. My personal thanks
Mike...NQoos
If you desire to be a profitable trader and understand the
value of learning from other successful traders then efuturevsion.com is a
perfect vehicle to accomplish this. This is only a sampling of the expertise
in trading education available in the efuturevision chat room, website and
after hour seminars for members. The education section and
Trading notes section
on efuturevision is open to the public. These contain setups and information
from Victoria, Mike, Jimmer, Brian, Ross and others. All profitable traders.
Members can access much more valuable trading information than what is in
the general public areas.
If this is still you,
choose today to change.
MACD
Aggressive Setup
MACD
Conservative Setup
DeMark REI Setup REI Stochastic Setup
REI
Note
9/30
Setup
Fast Stochastic (REI Substitute)
Location: With the Trend
Much
has been written about stochastics and how to trade them. In this
case, we are interested in having an indicator duplicate the action of the
DeMark REI as much as possible and to be reliable. I am not interested in
where the indicator turns over or crosses over. I want the entry into buy
and sell zones to be as accurate as possible and let the price action
control the trade entry using the same techniques as the REI.
The values are 5, 2, 2; overbought is 60 and oversold
in 35. Midpoint is 48.
Additionally, I am only interested in the K line (slow
line), not the D line (fast line).
So if you can blend the D line into the background,
all the better. I would use this arrangement only in the direction of the
Moving Average. Personally, I would never trade against the Moving Average
with this. As in the Range Expansion Index, there are two types of the
entries. They are the Market-On-Bar-Close and Buy/Sell Stop Method. Refer
to the section on the REI for the specifics.
Guidelines
We are looking
to take the trade in the direction of the Moving Average (30WMA).
With price bars and Moving Average going in the same
direction, the stochastic will reach an extreme zone. On any retracement or
consolidation, the indicator will pull back in a direction opposite the
Moving Average. Once the indicator enters the zone to initiate a trade in
the direction of the Moving Average, we initiate the entry methods outlined
in the earlier REI Section. This would be a conservative entry.
There is a school of thought on the use of stochastics
that enables a more aggressive entry. One can get on moves that the
conservative entry misses but will have some additional failures as well.
In a rapidly trending market, this aggressive entry may be the only one you
get due to the retracement of only a bar or two. This setup begins when the
indicator has retraced to midpoint (48) between the values of 60
(overbought) and 35 (oversold). At this point, the aggressive zone of
opportunity has been entered. The entry methods are the same as in the
conservative.
To illustrate how this works the following charts will
show both the REI and the fast Stochastic. The REI will be below the fast
stochastic (5,2,2).
| |
|
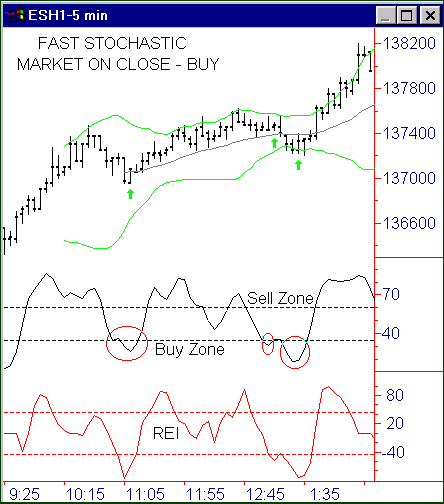
Here we see the Fast Stochastic above the
REI and the Moving Average is up. We want to go long. When the
indicator drops into the Buy Zone, we begin to look for the
opportunity to enter long. We have three examples. Note that
the second one would have resulted in a loss. Here is where it
takes conviction to reenter three bars later. And if you
examine the second entry closely, you’ll see that it really did
not qualify as an entry. The reason it did not meet the
qualifying condition is discussed in the REI Section. But some
will be lulled into taking #2 just because the indicator dropped
into the buy zone. |
 |
| |
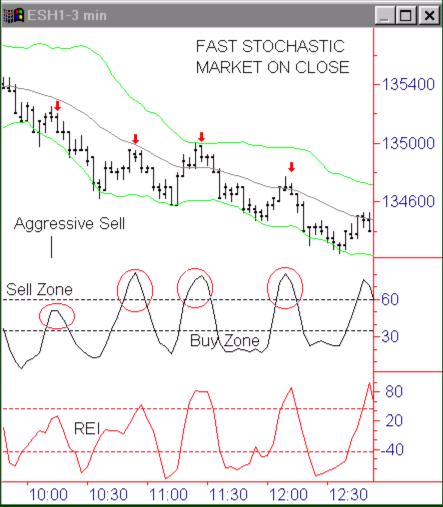
| In this sell example, I show an aggressive
setup first. Note the indicator retraced above the 48 midpoint
value. The next three sell setups are conservative. Note that
#3 (2nd conservative sell) does not meet the
qualifying requirement but is touching the upper BB. As John
Bollinger says, “Sell when touched.” |
 |
| |
| |