These contributions are from Mike Bruns, world class trader.
Mike's clear thinking and charts have allowed for many traders to finally
"get it". His generous sharing and teachings have helped me raise my level
of trading. Reinforcing the concepts of trading with the trend, his
knowledge of the bond market and other markets. Mike also gives after market
hours seminars for members, they are exceptional. My personal thanks
Mike...NQoos
If you desire to be a profitable trader and understand the
value of learning from other successful traders then efuturevsion.com is a
perfect vehicle to accomplish this. This is only a sampling of the expertise
in trading education available in the efuturevision chat room, website and
after hour seminars for members. The education section and
Trading notes section
on efuturevision is open to the public. These contain setups and information
from Victoria, Mike, Jimmer, Brian, Ross and others. All profitable traders.
Members can access much more valuable trading information than what is in
the general public areas.
If this is still you,
choose today to change.
MACD
Aggressive Setup
MACD
Conservative Setup DeMark REI Setup
REI
Stochastic Setup
REI
Note
9/30
Setup
Range Expansion Index by Tom
DeMark Setup
Location: With the Trend
Tom DeMark
developed this indicator. He discussed it in his book, “New Science
of Technical Analysis,” and published articles in various trading journals.
He has described the workings of the formula and how to trade it. Capital
West Investment has an excellent reprint of one on their website. I believe
the REI to be so fine, it is one of the few indicators I would pay extra to
a software company to have available for use.
The indicator has a buy zone, a sell zone and a neutral
zone. There are two entries that Mr. DeMark presents. I have a third one
that I use. We shall discuss one of his, which I shall call
“Market-On-Bar-Close” and my entry, which I call the “Buy/Sell Stop Method.”
We want to take a trade in the direction of the Moving
Average (30WMA). While prices are moving in the direction of the MA, they
will begin to retrace in the opposite direction and the REI will follow
suit. First, the indicator enters the zone in the direction of the move and
we are preparing to put on the trade.
Market-On-Bar-Close (MOBC) - there are two
conditions to be met, requiring 4 completed price bars:
The close of the just completed price bar is in the
direction of the MA compared to the close of the previous price bar (called
bar # 1). We enter at the “market” if the next condition has been met.
In the case of a buy set up, the low of the bar # 2
(preceding bar # 1) is below the low of bar # 3 (preceding bar # 2). Unlike
Mr. DeMark, I personally do not require bar # 2 and bar # 3 to have occurred
in, what I call, the “zone of opportunity.”
Buy/Sell Stop Method – is very straightforward
and could involve any number of price bars but usually less than 5.
Place a Stop (or Stop Limit) Order upon completion of
the first completed price bar after the indicator has entered the zone for
entering the trade in the direction of the Moving Average. Move the Order
to the next completed price bar until the stop is hit and we are in the
trade. The initial stop loss is the opposite end of the entry bar or last
completed bar.
| |
|
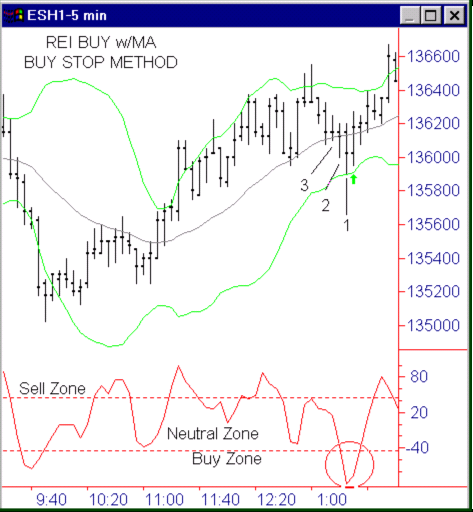
This SP mini (ES) example shows the Moving
Average is up, so we want to go long.
The REI drops into the Buy Zone. As we
monitor the price action, we see that lower lows have been
established. Then at the bar with the arrow, we prepare for the
close > previous close, in the direction of the Moving Average.
Bar # 2 and # 3 have established the precondition. We enter
long, “market” on the close of the arrowed bar. |
 |
| |
|
In this ES example, the Moving Average is
down. We want to go short. The REI rises into the Sell Zone.
As we watch the price bars, we note that the condition of higher
highs is satisfied (bars 2 and 3). We wait for the close below
the previous close.
It comes on the bar with the arrow. We
enter short at the ‘market.” Our stop loss can be placed at the
high of the entry bar. |
 |
| |
|
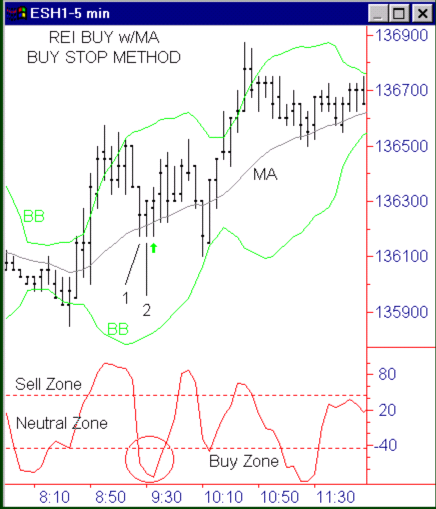
In this SP mini (ES) example, we desire to
go long. The first completed price bar where the indicator
enters the Buy Zone is bar # 1. We place a Buy Order just above
it. The next bar, # 2, is completed and we move the Buy Order
to just above it’s high. On the very next bar, the Buy stop is
hit and we are long. The initial stop loss is placed just below
the low of bar # 2. |
 |
| |
This chart shows that we want to go
short with the Moving Average. As the price bars are
completed once the indicator enters the Sell Zone, we enter
a Sell Stop Order (or Stop Limit). After each bar is
completed, we advance the Order to the next bar. Three bars
are completed and the Sell Stop is hit on the fourth (arrow)
bar and we are in the short trade. The initial stop loss is
placed above the last completed price bar.
|
 |